Getting Started with a Silkworm Rearing Kit: A Practical Guide
If you are considering raising Bombyx mori at home, you have probably started looking into the equipment and supplies you will need. A silkworm rearing kit can simplify the process enormously, especially for beginners who are not sure what they need. The idea of keeping a pet insect might seem unusual at first, but sericulture has a long history as a rewarding and educational hobby. With the right setup, watching the life cycle unfold from silkworm eggs to silkworm moth is genuinely fascinating.
A typical silkworm rearing kit includes several essential items, but not all kits are created equal. Before you buy one, it helps to understand what your silkworms will need at each stage. Bombyx mori larvae are delicate in their earliest days and require consistent care. Proper preparation makes the difference between a healthy colony and a failed hatch.
What to Expect from a Silkworm Rearing Kit
Most kits come with a rearing tray, silkworm bedding, and sometimes a silkworm cage. The rearing tray should be shallow and well-ventilated, because humidity and airflow matter. Silkworm bedding is usually a paper or mesh liner that makes cleaning easier. If the kit includes a cage, it is likely a mesh enclosure that prevents the larvae from wandering while allowing air circulation. Some kits also supply a starter amount of silkworm food, either as dried mulberry leaves or as a prepared silkworm chow.
One common mistake is assuming the kit contains everything you need for the entire life cycle. In reality, you will need to source fresh mulberry leaves or additional silkworm chow well before the larvae reach their second instar. The amount of food they consume increases dramatically with each moulting stage. A single Bombyx mori larva can eat fifty times its body weight in leaves by the time it spins a cocoon.

Choosing the Right Kit for Your Space
Kits range from small plastic containers designed for a classroom project to larger multi-tier setups for ongoing silkworm breeding. Consider how many silkworm eggs you plan to hatch. A standard kit with a single rearing tray works well for twenty to thirty larvae. If you intend to breed them through multiple generations, you will want a modular system that allows you to separate instars. Older larvae can accidentally crush younger ones, so staggered hatching requires separate trays.
The quality of the rearing tray matters more than you might think. Cheap trays with rough edges can injure the soft bodies of Bombyx mori larvae. Look for smooth plastic or coated wood. Some kits include a mesh bottom that allows frass to fall through, which keeps the bedding cleaner. That design is especially helpful during the later instars when waste production peaks.
Food Considerations
Mulberry leaves are the natural and preferred food for Bombyx mori. If you have access to a mulberry tree, you are in a good position. However, many people do not have a reliable source year-round. Silkworm chow is a prepared alternative made from mulberry leaf powder, water, and preservatives. It is convenient and consistent, but it must be stored properly to avoid spoilage. Some silkworm kits include a small bag of chow to get you started. That is useful, but you will need to order more before the larvae reach the fourth instar. A single larva will consume roughly one chow cube per day during its final week before pupation.
Fresh mulberry leaves should be washed and dried before feeding. Wet leaves can cause diarrhea in the larvae, which can kill them. If you use chow, it should be moist but not soggy. The texture should be firm enough to hold its shape. Larvae will refuse food that has dried out or turned sour. It is worth checking the food supply daily and removing any uneaten portions to prevent mold.
Hatching and Early Care
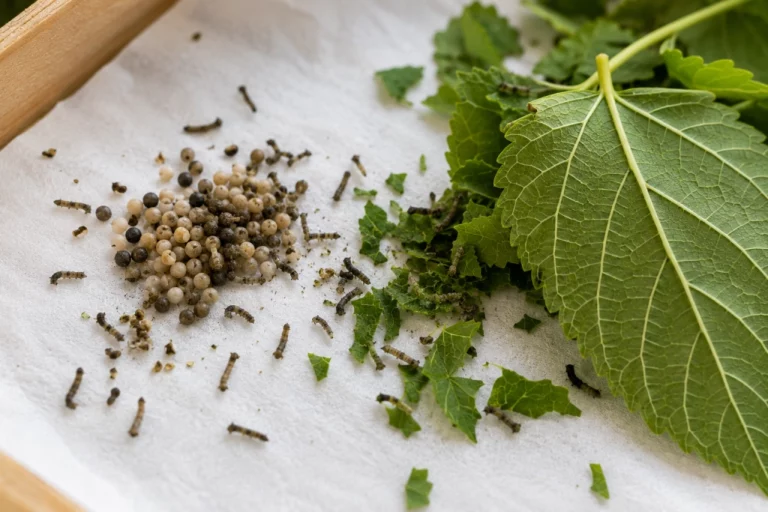
Silkworm eggs require a specific temperature range to hatch, usually between 22 and 28 degrees Celsius. Place the eggs on the bedding in the rearing tray and keep them in a warm spot out of direct sunlight. Hatching typically occurs within ten to fourteen days. The newly emerged larvae are tiny, barely a few millimeters long. They are extremely fragile at this stage. Do not handle them directly. Instead, move them with a soft brush or a leaf. A silkworm rearing kit that includes a fine mesh cover is helpful here because it prevents the tiny larvae from escaping while still allowing airflow.
During the first instar, the larvae need a constant supply of tender leaves or finely crumbled chow. Chop the mulberry leaves into small strips. Change the bedding every few days to remove frass and prevent bacterial growth. The larvae will go through four moults, each time shedding their skin and entering a new instar. Between moults they eat constantly and grow noticeably larger. By the fifth instar, they can be three to four inches long and eat voraciously.
Managing the Later Instars and Cocooning
As the larvae approach the end of the fifth instar, they stop eating and begin to wander. This is the signal that they are ready to spin a cocoon. You need to provide them with a suitable structure. Some silkworm kits include a cardboard rack or a bundle of twigs for this purpose. If your kit does not, you can use egg cartons or rolled paper. The larvae will climb into the crevices and start spinning. The process takes about three days. The cocoon is a single continuous thread of silk that can be unravelled later if you want to harvest it.
Inside the cocoon, the larva transforms into a chrysalis. After about two weeks, the adult silkworm moth emerges. Bombyx mori moths cannot fly and have reduced mouthparts, so they do not eat. Their only purpose is to mate and lay eggs. If you want to continue the cycle, you can collect the eggs and refrigerate them until you are ready to start again. Female moths lay between 300 and 500 eggs each, so you will have plenty for future generations.
Common Pitfalls and How to Avoid Them
Even with a good silkworm rearing kit, problems can arise. The most frequent issues are mold, overcrowding, and temperature swings. Mold develops quickly on leftover food and damp bedding. Remove uneaten chow daily and replace soiled bedding as needed. Overcrowding stresses the larvae and increases the risk of disease. A good rule of thumb is to allow at least one square inch of space per larva by the fourth instar. Temperature swings can delay development or kill the larvae. Keep the rearing tray in a stable environment away from drafts and heating vents.
Another issue is the quality of the silkworm eggs. If the eggs are not viable, the hatching rate will be low. Buy eggs from a reputable supplier. Some silkworm kits include eggs, but it is worth asking how recently they were laid. Older eggs lose viability. If possible, order eggs separately from a specialist breeder who stores them properly.
Is a Kit Worth It?
For someone new to sericulture, a silkworm rearing kit is a practical way to start. It bundles the basic equipment and often includes instructions specific to the species. You avoid the hassle of hunting down individual components that might not work together. However, do not expect the kit to cover everything. You will still need to plan your food supply, monitor the environment, and clean the tray regularly. The kit is a starting point, not a complete solution.
If you already keep other pet insects, you might prefer to assemble your own setup. A simple plastic storage bin with ventilation holes, a sheet of newspaper for bedding, and a small fan for airflow can work as well as any commercial product. The advantage of a kit is convenience and the peace of mind that comes from having components that are known to work together. The cost difference is usually small, and the time saved can be worthwhile.

Final Thoughts
Raising Bombyx mori is a patient person's hobby. The first few weeks involve careful feeding and cleaning, but the reward is watching a tiny egg transform into a moth over the course of a month. A silkworm rearing kit removes much of the guesswork, letting you focus on the daily care that matters most. Whether you are doing it for education, for silk, or simply for the pleasure of nurturing a living creature, the experience is memorable.
If you decide to try it, start with a small batch of eggs and a basic kit. Learn the rhythm of their feeding and cleaning schedule before scaling up. Once you have a few successful cycles under your belt, you can explore more advanced topics like silkworm breeding, silk harvesting, and even selective breeding for specific traits. For now, get your kit, prepare your space, and enjoy the process.